Baking normal maps in Blender 3.4 for Unreal Engine 5.
Hello dear readers!
Have you ever tried to create a low-poly mesh asset for your game that uses a normal map to make it look high-poly smooth? And have you ever tried to do this in Blender? I did, and it cost me some effort and head bumps :) So I'll put down detailed steps here so anyone (including future me) can easily achieve such a result.
Introduction
In this tutorial, it is expected that the reader has a basic understanding of what normal mapping is and how it works. Also, only the most basic Blender skills are necessary because I'll provide instructions for all the specialized Blender tasks here.
So what are we going to do today? We will transform a model on the image below from the left version into the right one using only normal mapping. Normal map baking is a technique for creating a normal map that fakes details (like bumps and dents) on the low-poly model using a high-poly model as a reference.
 |
| The same model with normal mapping applied (right) and without (left). |
1. Prepare a High-Poly version of your model.
To bake a normal map for a low-poly mesh first we need to get our hands on a detailed high-poly version of the mesh. And quite often modeling actually starts with the creation of a high-poly version first. Just for this tutorial, I created a nice high-poly model of a barrel.
 |
| Source high-poly model. |
2. Create a low-poly version.
Next, we need a low-poly mesh. Generally speaking, the more similar it will be to the high-poly version, the better. Basically, we will need to make a copy of our high-poly model with a reduced number of its polygons while preserving the general shape of the model.
Blender has numerous ways of doing that. I'll describe a couple of the simplest, but this is not a complete list of such instruments for sure. I'll extend this list later when I encounter other useful decimation techniques.
Create an entirely new mesh.
We can always create a low-poly model from the ground up. For my barrel example, a simple cylinder mesh is almost enough. With a scaled central section I got a quite decent fit for my high-poly mesh.
 |
| High-poly (400K faces) and low-poly (100 faces) models. |
Remesh Tool
Blender has a Remesh tool in the Sculpting workspace. It can be found on the Property editor panel->Active tool settings tab->Remesh group.
To use it for mesh decimation first, increase the Voxel Size to the size of your desired low-poly mesh grid step. And then click the Remesh button.
 |
| The Sculpting mode's Remesh tool. |
Decimate Modifier
There is also a Decimate Modifier that provides quite a few options for quickly making low-poly models.
To use this method:
- Select your mesh.
- Add modifier at Property editor panel->Modifier properties tab->Add Modifier drop-down->Decimate.
- Configure the Ratio of triangles to reduce to.
- Finally, Apply the modifier to be able to continue with the next steps of the normal map-baking process.
 |
| Decimate Modifier Settings. |
3. Check face orientations.
To bake a correct normal map it is important to check that all high-poly mesh faces are oriented the same way. Otherwise, parts of your normal map would be curved in opposite direction:
- Switch to the Modeling workspace.
- Open the Overlays dropdown.
- Check the Face Orientation checkbox.
Enabling the Face Orientation Overlay. - Switch to Face Select Mode.
- Select all the red faces.
- Select the menu item Mesh->Normals->Flip.
A mesh with inconsistent face orientations (Left) and a mesh with fixed face orientations.


4. Set up smoothing groups and sharp edges.
Before engaging with the baking process it is very important to understand that it is basically a raycasting along the low-poly mesh's normals. This means that to get correct baking results we need to correctly set up smoothing groups and hard edges on the low-poly mesh. The reasoning behind this statement is explained in great detail by Carlos Lemos in his tutorial on normal mapping.
In Blender, we can do this in the mesh Edit Mode:
- In the Edge Select Mode, you can select edges and then RMB->Mark/Clear Sharp.
- In the Face Select Mode, you can select faces and then RMB->Shade Smooth/Flat.
 |
| Same low-poly mesh with (right) and without (left) smoothing groups assigned. |
This already starts looking good :) Depending on your requirements, who knows, maybe this would already be good enough shading for your model without any kind of normal mapping.
5. UV-unwrap the Low-Poly model.
The next step is to assign UV coordinates to the model's vertices. In other words, create a UV map.
- Switch to UV Editing workspace.
- Select your model.
- Go to Edit Mode.
- Mark texture-unwrapping seams where necessary: in the Edge Select Mode select seam edges, RMB Click->Mark Seam.
- Select all the mesh elements, then use UV->Unwrap. You should see a UV map like in the following image.
 |
| A UV-unwrapped mesh with texture seams marked. |
Also, take into consideration this one small but important detail. If you have a sharp edge you probably better make it also a UV-seam. Because sharp edges bring discontinuities to the normal map, that is the normal map has greatly differing values on opposing sides of the edge. And they tend to "leak" across the edge creating ugly-looking "seams" on the model.
6. Create a Cage object
A Cage object is used as a source of raycasting during the baking process. Although a normal map baking in Blender can be made without a Cage object (that is with an implicitly created Cage object), using an explicitly created Cage object might yield more predictable and controllable baking results.
To create a Cage object:
- Duplicate your low-poly model in place. This copy will be a Cage object.
- Minimally move Cage's vertices in such a way that it fully encloses low-poly and high-poly models. Scale and the Shrink/Fatten tools will come in very handy for this task.
Note: it is important to only move vertices because editing a Cage or a low-poly model in any other way will make the two objects incompatible for the purpose of Raycasting.
7. Create a Material for the Low-Poly model
- Switch to the Shading workspace
- Select the low-poly object.
- At the top of the Shader Editor click the "New" button to create new material for it.
- From the menu select Add->Texture->ImageTexture.
- On the created Image Texture node click New.
- In the New Image pop-up dialog make sure to check the 32-bit Float checkbox. (You can read this article for more information about the importance of this parameter).
- Make sure to select "Non-Color" Color Space. This will allow Blender to correctly display meshes with this texture.
- From the menu select Add->Color->RGB Curves node. Use it to invert the G-channel of the texture. This is an important step to make your normal map properly work both in Blender and in UE without the need to further configure a normal map in the UE itself. Read this great article by Victor Karp for details.
- From the menu select Add->Vector->Normal Map node. Use it to set the normal map to the material.


In the end, your Material should look like this:
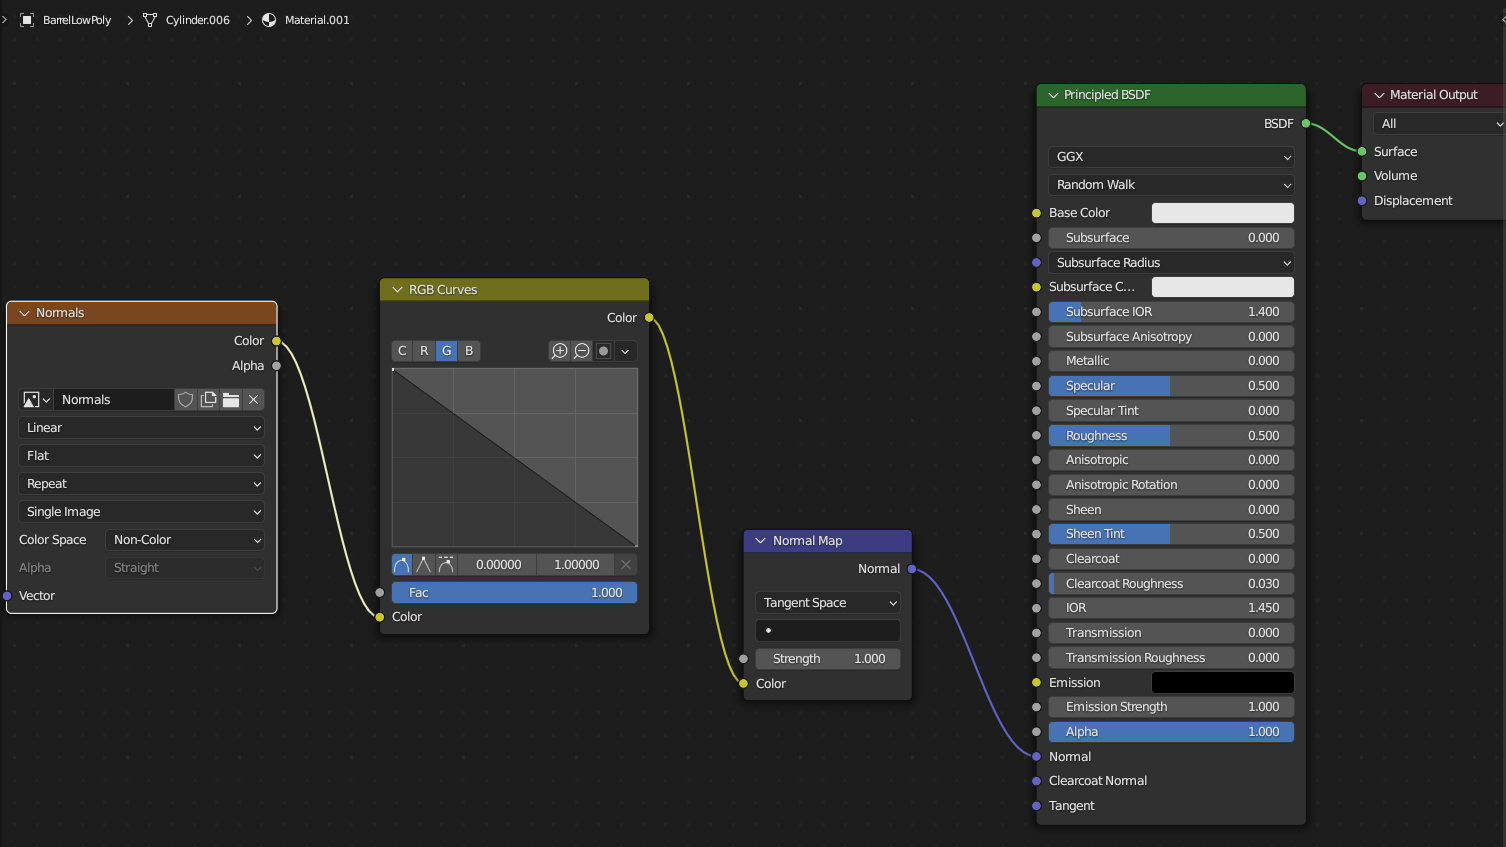 | |
|
8. Baking a Normal Map.
Next, we will bake a high-poly model's shape into a normal map for a low-poly model using the Cage object we created earlier.
- Switch to the Shading workspace. We will be working mainly in the Outliner and Properties panels.
- In the Properties panel switch to the Render Properties Tab.
- Change render engine to Cycles.
- In the Bake section select the Normal Bake Type.
- In the Bake section check the Selected to Active section and expand it.
- In the Selected to Active section check Cage and using the Eyedropper tool select the Cage object in the Outliner panel.
- Make sure that both high-poly and low-poly objects are not hidden.
- Select the high-poly object in the Outliner panel.
- Ctrl-Select low-poly object in the Outliner panel.
- Select the Normals texture node in the Shader Editor.
- In the Bake section click Bake.
- In the Bake section's Influence subsection set G to -Y for UE compatibility.
In the end, the properly configured Blender window for a baking process should look like this:
 |
| A Blender environment property configured for normal map baking. |
Possible error messages
Before moving next I think it is important to explain the error messages you will quite probably encounter. I find Blender error messages for the baking process very confusing.
- No active UV layer found in the object "LowPoly": check that you have created a UV map for the low-poly object as was explained in some of the previous sections.
- No active UV layer found in the object "HighPoly": you have selected the low-poly and high-poly objects in the wrong order. Well, this is true only for this example because I didn't make any UV map for the high-poly object. If you had one, you might have mistakenly baked your normals into the wrong object's texture...
- No active image found in material "Material.001" (0) for object "LowPoly": you have forgotten to create or select a texture for the Image Texture node.
- No valid selected objects: you haven't selected both the high-poly and low-poly objects or at least one of them is hidden.
9. Exporting the baked normal map.
To use our baked normal map in the Unreal Engine we first need to export it.
So let's export this normal map manually:
- Switch to Image Editor.
- Select your baked normal map (it is called "Normals" in my case).
- Select "Hamburger Menu"->Image->SaveAs...
- Configure the image file format. For simple cases, a default PNG configuration might suffice. But for high-quality results, it is advised to use OpenEXR with Full-Float Depth.


10. Importing the map into the Unreal Engine
At last, we can import our baked normal map into Unreal Engine:
- Drag-n-Drop the texture file into the Content Browser.
- Open the imported normal map in the UE and ensure that the Compression Settings property is set to Normalmap.
- Create a material that uses the normal map. Ensure the normal map's Texture Sample node's Sampler Type property is set to Virtual Normal.
 |
| An Unreal Engine Material with a normal map. |
[Note] If you are not making your own Normal map there is a chance that it might be made adhering to a standard different from the UE uses. This leads to incorrect lighting calculations. To fix this issue you can Check the Flip Green Channel property of the imported normal map. This Blender Stack Exchange answer explains the issue in amazing detail.
To show the results of our efforts, I set up a scene that demonstrates the effect of applying a normal map to the low-poly model.
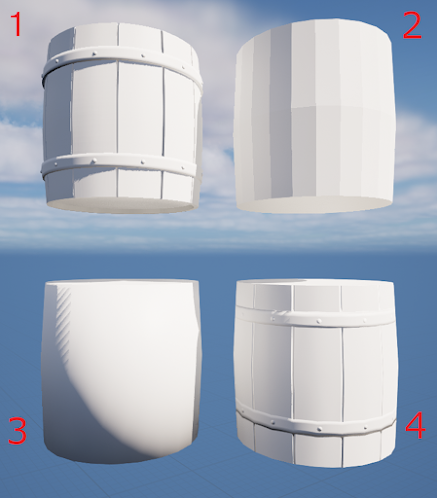 |
| 1 - original high-poly model; 2 - 4 - the same low-poly model with different normal maps: 2 - no smoothing groups and no normal mapping, 3 - a smoothing group and no normal mapping, 4 - a smoothing group and a baked normal map. |
Well, there is no doubt the high-poly mesh's shading on the first image looks really great without any normal maps applied. But if you consider that it uses 400K faces you wouldn't be very eager to use it directly in your game. The low-poly mesh has only 100 faces and it is really rough as seen in the 2nd sample that uses no normal maps too. The 3rd sample looks somewhat better adding smoothing groups and sharp edges. The 4th one is low-poly too but with a proper normal map and smoothing groups and it produces an amazing visual for a mesh of 100 faces. Normal mapping is a must-have optimization technique for modern games for sure.
The topic of this tutorial is for sure covered in many other places on the Internet, but I wasn't able to find any single place that would answer all my questions and allow me to polish my own workflow. I aggregated all the necessary pieces of knowledge scattered over the Internet in this article to make the normal map-baking process with the latest versions of Blender and UE a walk in the park.
No comments:
Post a Comment